Тематика помогает заменить набор представлений другим без необходимости изменять исходные файлы представлений. Вы должны установить свойство темы компонента приложения представления, чтобы использовать темы.
Вы также должны определить следующие свойства —
- yii \ base \ Theme :: $ basePath — Определяет базовый каталог для CSS, JS, изображений и т. д.
- yii \ base \ Theme :: $ baseUrl — Определяет базовый URL тематических ресурсов.
- yii \ base \ Theme :: $ pathMap — определяет правила замены.
yii \ base \ Theme :: $ basePath — Определяет базовый каталог для CSS, JS, изображений и т. д.
yii \ base \ Theme :: $ baseUrl — Определяет базовый URL тематических ресурсов.
yii \ base \ Theme :: $ pathMap — определяет правила замены.
Например, если вы вызовете $ this-> render (‘create’) в UserController, будет отображен файл представления @ app / views / user / create.php . Тем не менее, если вы включите их, как в следующей конфигурации приложения, вместо этого будет отображен файл вида @ app / themes / basic / user / create.php.
Шаг 1 — Модифицируйте файл config / web.php таким образом.
<?php
   $params = require(__DIR__ . '/params.php');
   $config = [
      'id' => 'basic',
      'basePath' => dirname(__DIR__),
      'bootstrap' => ['log'],
      'components' => [
         'request' => [
            // !!! insert a secret key in the following (if it is empty) - this
               //is required by cookie validation
            'cookieValidationKey' => 'ymoaYrebZHa8gURuolioHGlK8fLXCKjO',
         ],
         'cache' => [
            'class' => 'yii\caching\FileCache',
         ],
         'user' => [
            'identityClass' => 'app\models\User',
            'enableAutoLogin' => true,
         ],
         'errorHandler' => [
            'errorAction' => 'site/error',
         ],
         'mailer' => [
            'class' => 'yii\swiftmailer\Mailer',
            // send all mails to a file by default. You have to set
            // 'useFileTransport' to false and configure a transport
            // for the mailer to send real emails.
            'useFileTransport' => true,
         ],
         'log' => [
            'traceLevel' => YII_DEBUG ? 3 : 0,
            'targets' => [
               [
                  'class' => 'yii\log\FileTarget',
                  'levels' => ['error', 'warning'],
               ],
            ],
         ],
         'view' => [
            'theme' => [
               'basePath' => '@app/themes/basic',
               'baseUrl' => '@web/themes/basic',
               'pathMap' => [
                  '@app/views' => '@app/themes/basic',
               ],
            ],
         ],
         'db' => require(__DIR__ . '/db.php'),
      ],
      'modules' => [
         'hello' => [
            'class' => 'app\modules\hello\Hello',
         ],
      ],
      'params' => $params,
   ];
   if (YII_ENV_DEV) {
      // configuration adjustments for 'dev' environment
      $config['bootstrap'][] = 'debug';
      $config['modules']['debug'] = [
         'class' => 'yii\debug\Module',
      ];
      $config['bootstrap'][] = 'gii';
      $config['modules']['gii'] = [
         'class' => 'yii\gii\Module',
      ];
   }
   return $config;
?>
Мы добавили компонент приложения View
Шаг 2 — Теперь создайте структуру каталогов web / themes / basic и themes / basic / site . Внутри папки themes / basic / site создайте файл about.php со следующим кодом.
<?php
   /* @var $this yii\web\View */
   use yii\helpers\Html;
   $this->title = 'About';
   $this->params['breadcrumbs'][] = $this->title;
   $this->registerMetaTag(['name' => 'keywords', 'content' => 'yii, developing,
      views, meta, tags']);
   $this->registerMetaTag(['name' => 'description', 'content' => 'This is the
      description of this page!'], 'description');
?>

<div class = "site-about">
   <h1><?= Html::encode($this->title) ?></h1>

   <p style = "color: red;">
      This is the About page. You may modify the following file to customize its content:
   </p>
</div>
Шаг 3. Теперь перейдите по адресу http: // localhost: 8080 / index.php? R = site / about , будет отображен файл themes / basic / site / about.php вместо views / site / about.php .
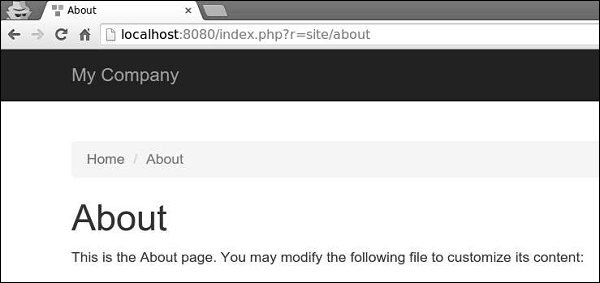
Шаг 4 — Для модулей темы настройте свойство yii \ base \ Theme :: $ pathMap следующим образом.
'pathMap' => [
   '@app/views' => '@app/themes/basic',
   '@app/modules' => '@app/themes/basic/modules',
],
Шаг 5 — Для виджетов темы настройте свойство yii \ base \ Theme :: $ pathMap следующим образом.
'pathMap' => [
   '@app/views' => '@app/themes/basic',
   '@app/widgets' => '@app/themes/basic/widgets', // <-- !!!
],
Иногда вам нужно указать основную тему, которая содержит базовый внешний вид приложения. Для достижения этой цели вы можете использовать тему наследования.
Шаг 6 — Измените компонент приложения View таким образом.
'view' => [
   'theme' => [
      'basePath' => '@app/themes/basic',
      'baseUrl' => '@web/themes/basic',
      'pathMap' => [
         '@app/views' => [
            '@app/themes/christmas',
            '@app/themes/basic',
         ],
      ]
   ],
],
В приведенной выше конфигурации файл представления @ app / views / site / index.php будет тематически представлен как @ app / themes / christmas / site / index.php или @ app / themes / basic / site / index.php, в зависимости от на котором файл существует. Если оба файла существуют, будет использован первый.
Шаг 7 — Создайте структуру каталогов themes / christmas / site .
Шаг 8 — Теперь внутри папки themes / christmas / site создайте файл about.php со следующим кодом.
<?php
   /* @var $this yii\web\View */
   use yii\helpers\Html;
   $this->title = 'About';
   $this->params['breadcrumbs'][] = $this->title;
   $this->registerMetaTag(['name' => 'keywords', 'content' => 'yii, developing,
      views, meta, tags']);
   $this->registerMetaTag(['name' => 'description', 'content' => 'This is the
      description of this page!'], 'description');
?>

<div class = "site-about">
   <h2>Christmas theme</h2>
   <img src = "http://pngimg.com/upload/fir_tree_PNG2514.png" alt = ""/>
   <p style = "color: red;">
      This is the About page. You may modify the following file to customize its content:
   </p>
</div>
Шаг 9 — Если вы перейдете по адресу http: // localhost: 8080 / index.php? R = site / about , вы увидите обновленную страницу about, используя тему Рождества.